
Timofey Lonchakov
Verified Expert in Engineering
Timofey在c++ /Windows平台上有14年的编程经验, over 4 years working with QT, and experience with SQL.
Timofey在c++ /Windows平台上有14年的编程经验, over 4 years working with QT, and experience with SQL.
With the availability of tools like DirectX and OpenGL, 如今,编写一个渲染3D元素的桌面应用程序并不是很困难. However, like many technologies, 有时候开发者很难进入这个细分市场. Over time, DirectX和OpenGL之间的竞争使得开发人员更容易使用这些技术, 以及更好的文档和成为熟练的DirectX或更容易的过程 OpenGL developer.
DirectX是由微软公司推出并维护的一项面向internet的技术 Windows platform. On the other hand, OpenGL 是3D图形领域的跨平台API,其规范由Khronos Group维护.
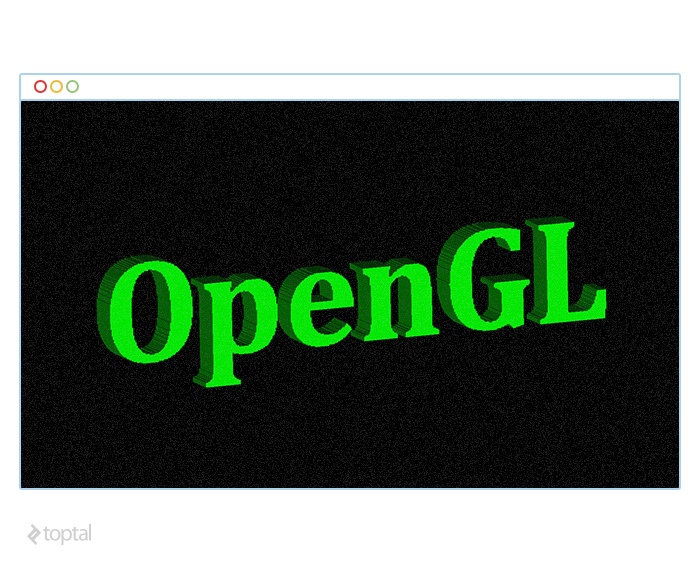
In this introduction to OpenGL, 我将解释如何编写一个非常简单的应用程序来渲染3D文本模型. We will be using Qt/Qt Creator to implement the UI, 使其易于在多个平台上编译和运行此应用程序. 本文构建的原型的源代码是 available on GitHub.
The goal of this simple application is to generate 3D models,将它们保存到一个格式简单的文件中,然后在屏幕上打开并呈现它们. 渲染场景中的3D模型将可旋转和缩放, to give a better sense of depth and dimension.
Before getting started, 我们需要用一些有用的工具为这个项目准备我们的开发环境. 我们首先需要的是Qt框架和相关的实用程序, which can be downloaded from www.qt.io. It may also be available through your operating system’s standard package manager; if that is the case, you might want to try with it first. 本文要求您对Qt框架有一定的了解. However, if you are not familiar with the framework, please do not feel discouraged to follow along, 因为原型依赖于框架的一些相当琐碎的特性.
You can also use Microsoft Visual Studio 2013 on Windows. 在这种情况下,请确保您使用适当的 Qt Addin for Visual Studio.
At this point, you might want to clone the repository from GitHub and follow it as you read through this article.
我们将首先使用一个文档小部件创建一个简单的Qt应用程序项目. 由于它是一个基本的小部件,编译和运行它不会产生任何有用的东西. 使用Qt设计器,我们将添加一个“文件”菜单,其中包含四个选项:“新建…”,“打开…”,“关闭”和“退出”。. 您可以找到将这些菜单项绑定到相应操作的代码 in the repository.
点击“New…”应该会弹出一个对话框,看起来像这样:

Here, the user may enter some text, choose a font, tweak the resulting model height, and generate a 3D model. Clicking on “Create” should save the model, 如果用户从左下角选择适当的选项,也应该打开它. As you can tell, 这里的目标是将一些用户输入的文本转换为3D模型并在显示器上呈现.
The project will have a simple structure, 组件将被分解成几个c++和头文件:

Files contain QDialog derived object. 这实现了允许用户输入文本的对话框小部件, select font, 并选择是否将结果保存到文件和/或以3D形式显示.
包含QOpenGLWidget派生对象的实现. This widget is used to render the 3D scene.
Contains implementation of the main application widget. 这些文件没有改变,因为它们是由Qt Creator向导创建的.
包含main(…)函数,该函数创建主应用程序小部件并将其显示在屏幕上.
Contains functionality of creation of 2D scene.
包含存储3D模型对象并允许对其进行操作的结构(保存), load etc.).
包含类的实现,允许创建3D场景模型对象.
For brevity, 我们将跳过用Qt Designer实现用户界面的明显细节, 以及定义交互元素行为的代码. 当然,这个原型应用程序还有一些更有趣的方面, 它们不仅重要,而且与我们想要介绍的3D模型编码和渲染相关. For example, 在此原型中,将文本转换为3D模型的第一步涉及将文本转换为2D单色图像. Once this image is generated, 可以知道图像的哪个像素构成了文本, and which ones are just “empty” space. 有一些使用OpenGL渲染基本文本的更简单的方法, 但我们采取这种方法是为了覆盖一些细节的3D渲染与OpenGL.
To generate this image,我们用QImage::Format_Mono标志实例化一个QImage对象. 因为我们只需要知道哪些像素是文本的一部分,哪些不是, a monochrome image should work just fine. 当用户输入一些文本时,我们同步更新这个QImage对象. Based on the font size and image width, 我们尽量在用户定义的高度内匹配文本.
接下来,我们枚举作为文本一部分的所有像素——在这种情况下,是黑色像素. 这里的每个像素都被视为单独的方形单元. Based on this, we can generate a list of triangles, computing the coordinates of their vertices, and store them in our 3D model file.
现在我们有了自己的简单3D模型文件格式,我们可以开始专注于渲染它. 对于基于OpenGL的3D渲染,Qt提供了一个名为QOpenGLWidget的小部件. To use this widget, three functions may be overridden:
我们将通过在initializeGl方法中设置适当的着色器配置来初始化小部件.
glEnable(GL_DEPTH_TEST);
glShadeModel(GL_FLAT);
glDisable(GL_CULL_FACE);
第一行使程序只显示那些离我们更近的渲染像素, 而不是那些在其他像素后面,看不见的. The second line specifies the flat shading technique. 第三行使程序渲染三角形,而不管它们的法线指向哪个方向.
初始化后,每次调用paintGl时,我们都会在显示器上渲染模型. 在重写paintGl方法之前,我们必须准备缓冲区. To do that, we first create a buffer handle. We then bind the handle to one of the binding points, copy the source data into the buffer, and finally we tell the program to unbind the buffer:
//获取Qt对象,该对象允许对缓冲区进行操作
QOpenGLFunctions func (QOpenGLContext:: currentContext ());
// Create the buffer handle
funcs.glGenBuffers(1, &handle);
//通过句柄选择buffer(所以我们将使用这个buffer)
// further)
funcs.glBindBuffer(GL_ARRAY_BUFFER, handle);
// Copy data into the buffer. Being copied,
//源数据不再使用,可以释放
funcs.glBufferData(GL_ARRAY_BUFFER,
	size_in_bytes,
	src_data,
	GL_STATIC_DRAW);
// Tell the program we’ve finished with the handle
funcs.glBindBuffer(GL_ARRAY_BUFFER, 0);
Inside the overriding paintGl method, 我们使用一个顶点数组和一个法线数据数组来绘制每一帧的三角形:
QOpenGLFunctions func (QOpenGLContext:: currentContext ());
// Vertex data
glEnableClientState(GL_VERTEX_ARRAY)
funcs.glBindBuffer(GL_ARRAY_BUFFER, m_hVertexes);	// Use this one
glVertexPointer(3, GL_FLOAT, 0, 0);		// Data format
funcs.glVertexAttribPointer(m_coordVertex, 3, GL_FLOAT,
	GL_FALSE, 0, 0);	// Provide into shader program

// Normal data
glEnableClientState(GL_NORMAL_ARRAY);//使用NORMAL缓冲区
funcs.glBindBuffer(GL_ARRAY_BUFFER, m_normals)
glNormalPointer(GL_FLOAT, 0, 0);	// Data format
funcs.glEnableVertexAttribArray(m_coordNormal);	// Shader attribute
funcs.glVertexAttribPointer(m_coordNormal, 3, GL_FLOAT,
	GL_FALSE, 0, 0);	// Provide into shader program

// Draw frame
glDrawArrays(GL_TRIANGLES, 0, (3 * m_model.GetTriangleCount()));

// Rendering finished, buffers are not in use now
funcs.glDisableVertexAttribArray(m_coordNormal);
funcs.glBindBuffer(GL_ARRAY_BUFFER, 0);
glDisableClientState(GL_VERTEX_ARRAY);
glDisableClientState(GL_NORMAL_ARRAY);
为了提高性能,我们在原型应用程序中使用了顶点缓冲对象(VBO). 这让我们可以将数据存储在显存中,并直接用于渲染. 另一种方法是提供数据(顶点坐标), normals and colors) from the rendering code:
glBegin(GL_TRIANGLES);
	// Provide coordinates of triangle #1
	glVertex3f( x[0], y[0], z[0]);
	glVertex3f( x[1], y[1], z[1]);
	glVertex3f( x[2], y[2], z[2]);
	// Provide coordinates of other triangles
	...
glEnd();
This may seem like a simpler solution; however, it has serious performance implications, 因为这需要数据通过显存总线传输,这是一个相对较慢的过程. 在实现paintGl方法之后,我们必须注意着色器:
m_shaderProgram.addShaderFromSourceCode(QOpenGLShader::Vertex,
    	QString::fromUtf8(
        	"#version 400\r\n"
        	"\r\n"
        	"layout (location = 0) in vec3 coordVertexes;\r\n"
        	"layout (location = 1) in vec3 coordNormals;\r\n"
        	"flat out float lightIntensity;\r\n"
        	"\r\n"
        	"uniform mat4 matrixVertex;\r\n"
        	"uniform mat4 matrixNormal;\r\n"
        	"\r\n"
        	"void main()\r\n"
 	       	"{\r\n"
        	"   gl_Position = matrixVertex * vec4(coordVertexes, 1.0);\r\n"
        	lightIntensity = abs((matrixNormal * vec4(coordNormals, 1).0)).z);\r\n"
        	"}"));
m_shaderProgram.addShaderFromSourceCode(QOpenGLShader::Fragment,
    	QString::fromUtf8(
        	"#version 400\r\n"
        	"\r\n"
        	"flat in float lightIntensity;\r\n"
        	"\r\n"
        	"layout (location = 0) out vec4 FragColor;\r\n"
        	"uniform vec3 fragmentColor;\r\n"
        	"\r\n"
        	"void main()\r\n"
        	"{\r\n"
        	"	FragColor = vec4(fragmentColor * lightIntensity, 1.0);\r\n"
        	"}"));
	m_shaderProgram.link();
	m_shaderProgram.bind();

	m_coordVertex =
		m_shaderProgram.attributeLocation(QString::fromUtf8("coordVertexes"));
	m_coordNormal =
		m_shaderProgram.attributeLocation(QString::fromUtf8("coordNormals"));
	m_matrixVertex =
		m_shaderProgram.uniformLocation(QString::fromUtf8("matrixVertex"));
	m_matrixNormal =
		m_shaderProgram.uniformLocation(QString::fromUtf8("matrixNormal"));
	m_colorFragment =
		m_shaderProgram.uniformLocation(QString::fromUtf8("fragmentColor"));
在OpenGL中,着色器是使用一种叫做 GLSL. 该语言旨在使渲染之前的3D数据操作变得容易. 这里,我们需要两个着色器:顶点着色器和片段着色器. In vertex shader, 我们将用变换矩阵变换坐标来应用旋转和缩放, and to calculate color. 在片段着色器中,我们将为片段分配颜色. 这些着色器程序必须被编译并与上下文链接. OpenGL提供了连接这两种环境的简单方法,以便程序内部的参数可以从外部访问或分配:
// Get model transformation matrix
QMatrix4x4 matrixVertex;
... // Calculate the matrix here
// Set Shader Program object' parameters
m_shaderProgram.setUniformValue(m_matrixVertex, matrixVertex);
In the vertex shader code, 我们通过在原始顶点上应用变换矩阵来计算新的顶点位置:
gl_Position = matrixVertex * vec4(coordVertexes, 1.0);
To compute this transformation matrix, we compute a few separate matrices: screen scale, translate scene, scale, rotate, and center. 然后我们求出这些矩阵的乘积来计算最终的变换矩阵. Start by translating the model center to the origin (0, 0, 0), which is the center of the screen as well. 旋转是由用户使用一些指向设备与场景的交互决定的. 用户可以点击场景并拖动旋转. When the user clicks, we store the cursor position, 移动之后,我们得到第二个光标位置. 使用这两个坐标,加上场景中心,我们形成了一个三角形. 通过一些简单的计算,我们可以确定旋转角度, 我们可以更新旋转矩阵来反映这个变化. For scaling, 我们仅仅依靠鼠标滚轮来修改OpenGL小部件的X轴和Y轴的缩放因子. The model is translated back by 0.5保持它在渲染场景的平面后面. Finally, 为了保持自然的长宽比,我们需要调整模型沿长边扩展的减少(不像OpenGL场景), 呈现它的小部件可能沿两个轴具有不同的物理尺寸). 综合这些,我们计算出最终的变换矩阵如下:
void GlWidget::GetMatrixTransform(QMatrix4x4& matrixVertex,
                                 const Model3DEx& model)
{
   matrixVertex.setToIdentity();

   QMatrix4x4 matrixScaleScreen;
   double dimMin = static_cast(qMin(width(), height()));
   float scaleScreenVert = static_cast(dimMin /
       static_cast(height()));
   float scaleScreenHorz = static_cast(dimMin /
       static_cast(width()));
   matrixScaleScreen.scale(scaleScreenHorz, scaleScreenVert, 1.0f);

   QMatrix4x4 matrixCenter;
   float centerX, centerY, centerZ;
   model.GetCenter(centerX, centerY, centerZ);
   matrixCenter.translate(-centerX, -centerY, -centerZ);

   QMatrix4x4 matrixScale;
   float radius = 1.0;
   model.GetRadius(radius);
   float scale = static_cast(m_scaleCoeff / radius);
   matrixScale.scale(scale, scale, 0.5f / radius);

   QMatrix4x4 matrixTranslateScene;
   matrixTranslateScene.translate(0.0f, 0.0f, -0.5f);

   matrixVertex = matrixScaleScreen * matrixTranslateScene * matrixScale * m_matrixRotate * matrixCenter;
}
In this introduction to OpenGL 3D rendering, 我们探索了一种允许我们利用视频卡渲染3D模型的技术. 这比使用CPU周期来实现相同的目的要高效得多. We used a very simple shading technique, 并通过对用户鼠标输入的处理,使场景具有交互性. 我们避免使用显存总线在显存和程序之间来回传递数据. 尽管我们只是在3D中渲染了一行文本, 更复杂的场景可以用非常相似的方式渲染.
公平地说,本教程几乎没有触及3D建模和渲染的表面. This is a vast topic, 这个OpenGL教程不能声称这是所有你需要知道的,能够建立3D游戏或建模软件. However, 本文的目的是让您了解这个领域, 并展示如何轻松地开始使用OpenGL构建3D应用程序.
Located in Moscow, Russia
Member since September 20, 2014
Timofey在c++ /Windows平台上有14年的编程经验, over 4 years working with QT, and experience with SQL.
 作者都是各自领域经过审查的专家,并撰写他们有经验的主题. 我们所有的内容都经过同行评审,并由同一领域的Toptal专家验证.
23
World-class articles, delivered weekly.
World-class articles, delivered weekly.
Join the Toptal® community.
